728x90
PHP와 Ajax를 이용한 로그인 예제
1. 로그인 페이지를 작성합니다.
(method를 get방식으로 지정하면 url에 정보가 표시되므로 post방식으로 지정합니다.)
login.php
<form name="myForm" method="post" action="./checkLogin.php">
   	<input type="text" name="userId" />
   	<input type="password" name="userPassword" />
   	<button type="submit">login</button>
</form>
2. Ajax 내용을 작성합니다.
</body> 위에 ajax 내용을 작성합니다.
<script>
	// myForm에 있는 submit을 클릭하면 다음 이벤트가 실행됩니다.
	$('[name=myForm] [type=submit]').click(function(e){
    	// submit 버튼의 이벤트를 중단시킨다.
        e.preventDefault();

        let userId = $('#userId').val();
        let userPassword = $('#userPassword').val();

        $.ajax({
            url: './checkLogin.php',
            data: {
                userId: userId,
                userPassword: userPassword
            },
            type: "POST",
            dataType: "json",
            success: function(data){
            	console.log(data);
                if(data.status)
                	console.log("로그인 성공");
                else
                    console.log("로그인 실패");
            },
            error: function(err){
				alert(err);
            }
        });
    });
</script>
3. checkLogin.php 작성
<?php
    // 클라이언트쪽의 jQuery의 ajax 메소드에서 {dataType:"json"} 으로 지정했다면
    // 서버쪽에서 보내는 데이터의 컨텐츠 타입도 json 으로 지정합니다.
    header("Content-Type: application/json");

    $userId = $_POST["userId"];
    $userPassword = $_POST["userPassword"];

    // userId, userPwd 로 인증
    if($userId === 'testId' && $userPassword === '1234') {
    	$status = true;
    	$userName = "minsu";
    } else {
        $status = false;
        $userName = null;
    }

    $response = array('status' => $status, 'userName' => $userName);

    echo json_encode($response); // json 형식으로 echo 함.
    // 이것 외에 다른 값을 출력하면 안됨
    // echo, print, print_r, var_dump 등등
?>
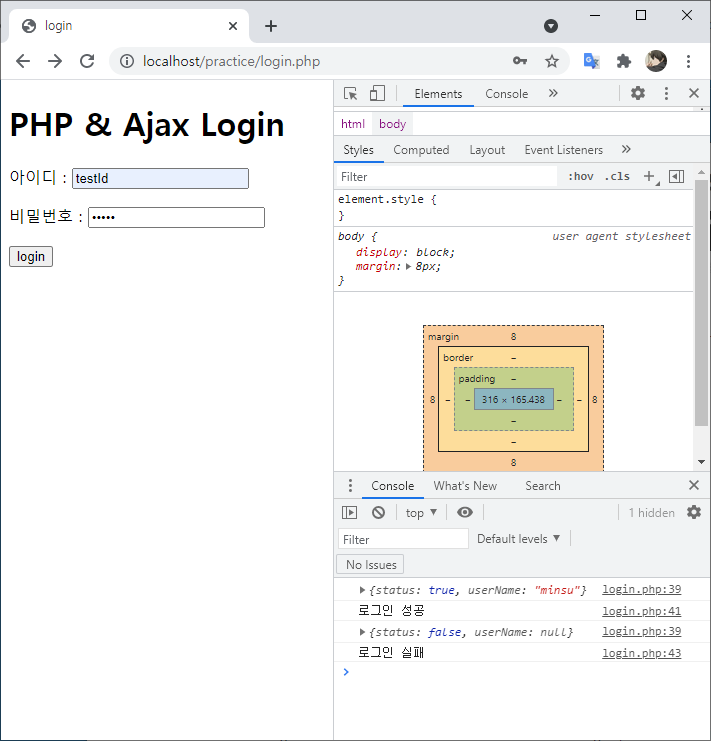
결과화면
코드 완성본
login.php
<!DOCTYPE html>
<html lang="ko">
<head>
    <meta charset="UTF-8">
    <meta http-equiv="X-UA-Compatible" content="IE=edge">
    <meta name="viewport" content="width=device-width, initial-scale=1.0">
    <title>login</title>
</head>
<body>
    <h1>PHP & Ajax Login</h1>
    <form name="myForm" method="post" action="./checkLogin.php">
        <p>아이디 : <input type="text" name="userId" /></p>
        <p>비밀번호 : <input type="password" name="userPassword" /></p>
        <button type="submit">login</button>
    </form>

    <!-- jQuery 스크립트 -->
    <script src="https://ajax.googleapis.com/ajax/libs/jquery/3.6.0/jquery.min.js"></script>

    <!-- JavaScript 스크립트 -->
    <script>
	// myForm에 있는 submit을 클릭하면 다음 이벤트가 실행됩니다.
	$('[name=myForm] [type=submit]').click(function(e){
    	// submit 버튼의 이벤트를 중단시킨다.
        e.preventDefault();

        let userId = $('[name=userId]').val();
        let userPassword = $('[name=userPassword]').val();

        $.ajax({
            url: './checkLogin.php',
            data: {
                userId: userId,
                userPassword: userPassword
            },
            type: "POST",
            dataType: "json",
            success: function(data){
                console.log(data);
                if(data.status)
                    console.log("로그인 성공");
                else
                    console.log("로그인 실패");
            },
            error: function(err){
				alert(err);
            }
        });
    });
    </script>
</body>
</html>
checkLogin.php
<?php
    // 클라이언트쪽의 jQuery의 ajax 메소드에서 {dataType:"json"} 으로 지정했다면
    // 서버쪽에서 보내는 데이터의 컨텐츠 타입도 json 으로 지정합니다.
    header("Content-Type: application/json");

    $userId = $_POST["userId"];
    $userPassword = $_POST["userPassword"];

    // userId, userPwd 로 인증
    if($userId === 'testId' && $userPassword === '1234') {
    	$status = true;
    	$userName = "minsu";
    } else {
        $status = false;
        $userName = null;
    }

    $response = array('status' => $status, 'userName' => $userName);

    echo json_encode($response); // json 형식으로 echo 함.
    // 이것 외에 다른 값을 출력하면 안됨
    // echo, print, print_r, var_dump 등등
?>
728x90
'PHP' 카테고리의 다른 글
| 33. PHP 날짜 더하기, 빼기 & 날짜 크기 비교하기 (0) | 2021.07.21 |
|---|---|
| 32. PHP Form 유효성 검사 & input 데이터 가공 처리 (0) | 2021.07.21 |
| 30. PHP(7.4) & Linux(Ubuntu 20.04) & MSSQL 연동하기 (0) | 2021.07.09 |
| 29. PHP 이미지 파일 용량 줄이기 (0) | 2021.04.22 |
| 28. PHP Form 검증 (0) | 2021.03.10 |